1 NOTICENINJA Workflows:
Workflows are used to manage all the
activities in the system. It also holds other related information to the
workflow such as the tasks, documents, contacts, notes, and communications. All
workflows use the same screen to help make the system simple to use and easy to
navigate around in. Each Workflow Type will be listed here for review.
1.2 Notice
Workflow:
1.3 POA Workflow:
1.5 Agency Refund Check Workflow:
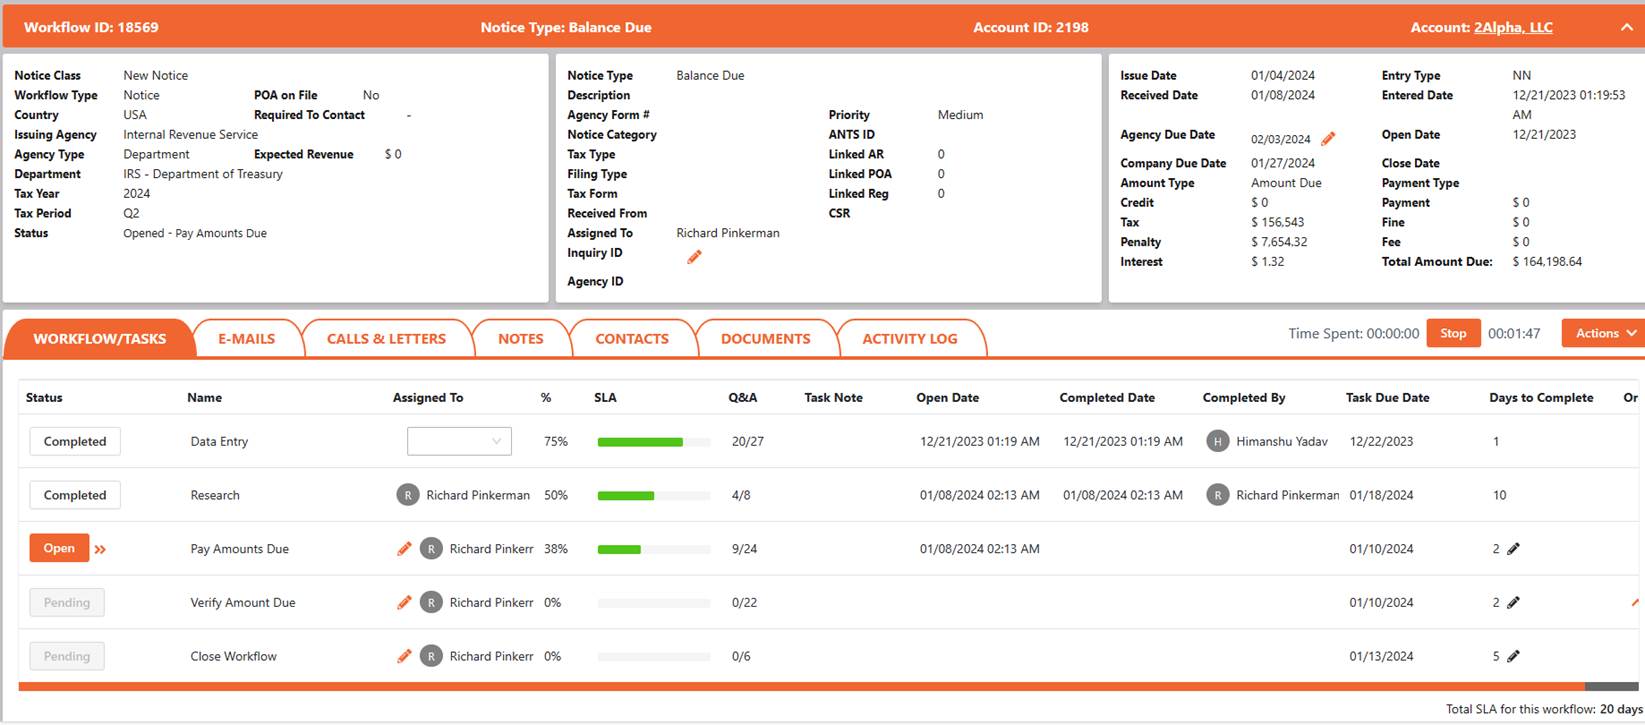
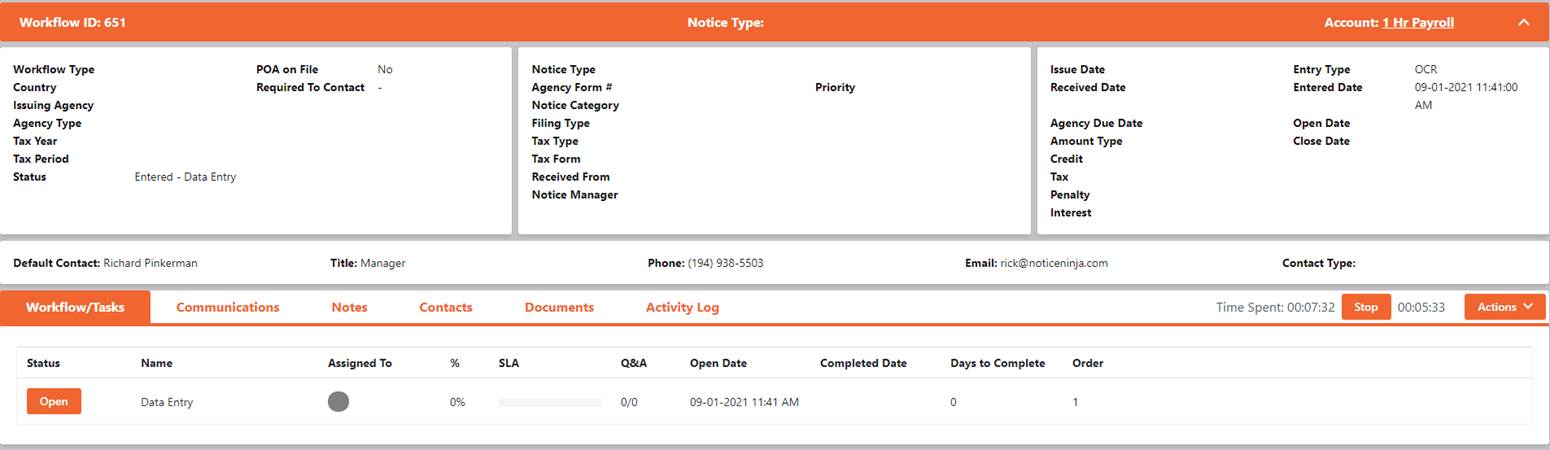
Notice Workflows: Below we will review a Notice workflow.
The top part of the screen has three sections
(boxes); Demographics, Notice Options, and Relative Dates & Amounts. Each
section displays relevant data based on the individual notice workflow. The
notice class helps identify the Notice and Account
There are 7 tabs across the middle of the screen.
Each tab has related data based on the individual notice workflow.
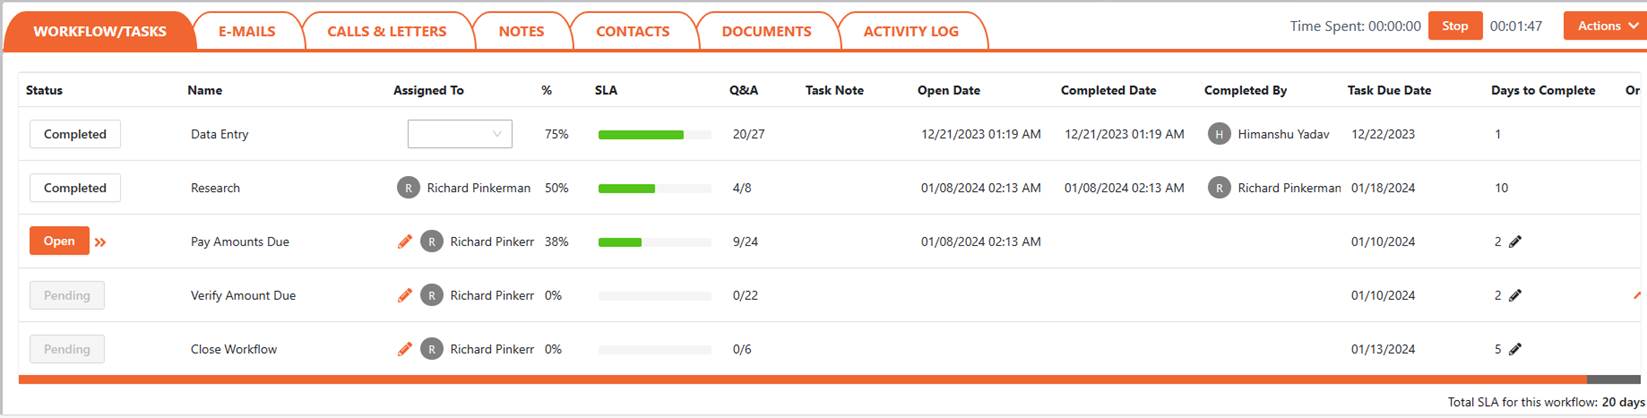
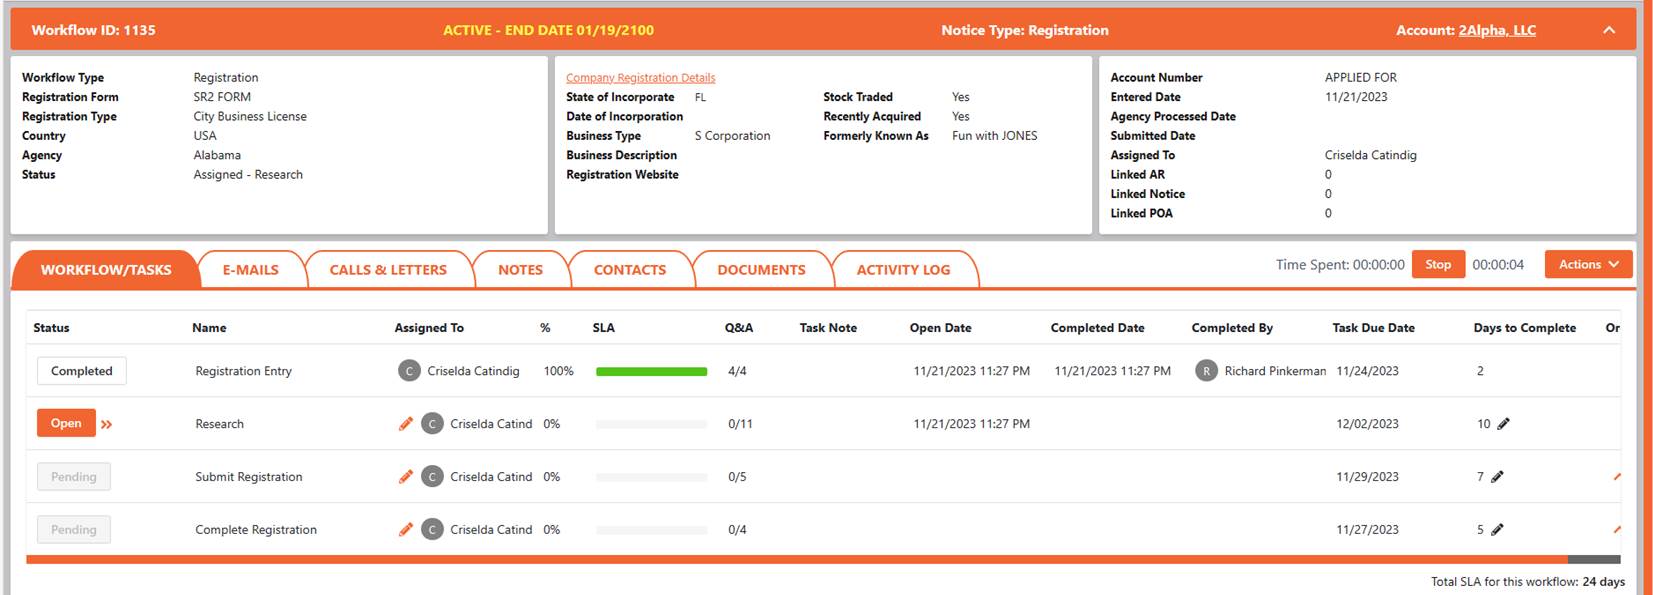
1. Workflows / Tasks Tab: This tab is used to hold all the tasks associated
to the given workflow. Use this tab to complete the tasks in chronological
order to resolve the workflow. To open a task, click the Open button to see the
details of the task.
Add New Task: From the Actions dropdown select Add Task.
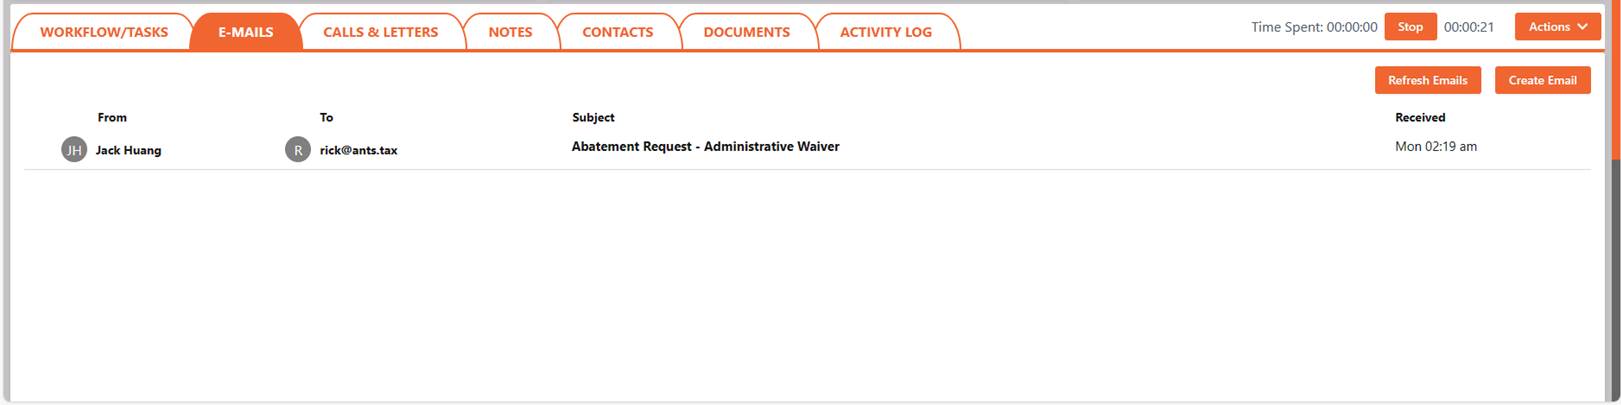
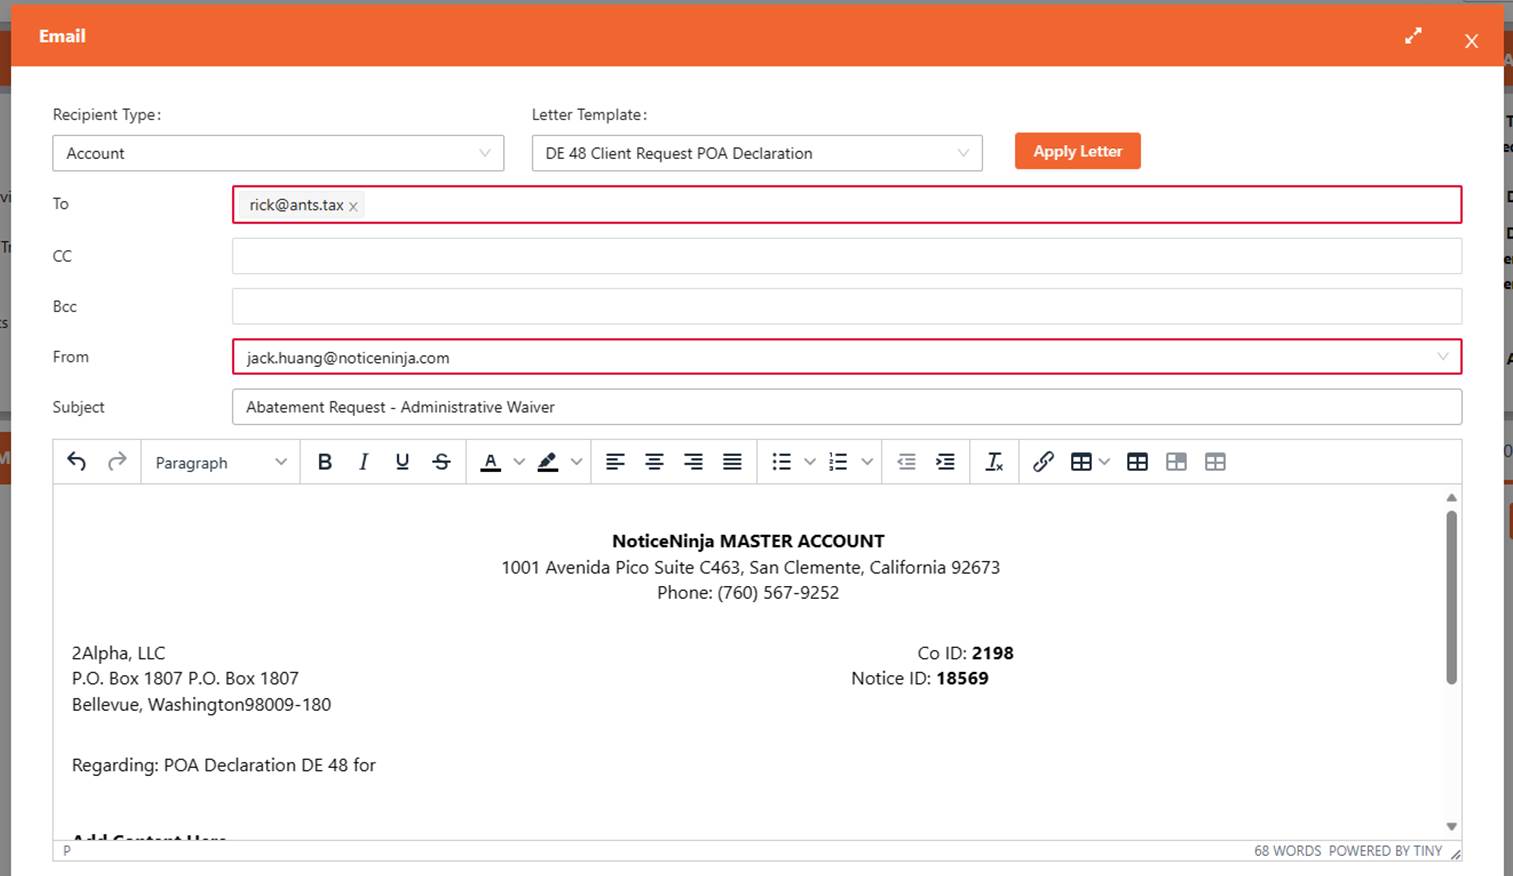
2.
E-Mails
Tab: This tab is used to track and store all the workflows emails that are
sent out on the notice. When the account contact replies to the email it will
be listed in NOTICENINJA.
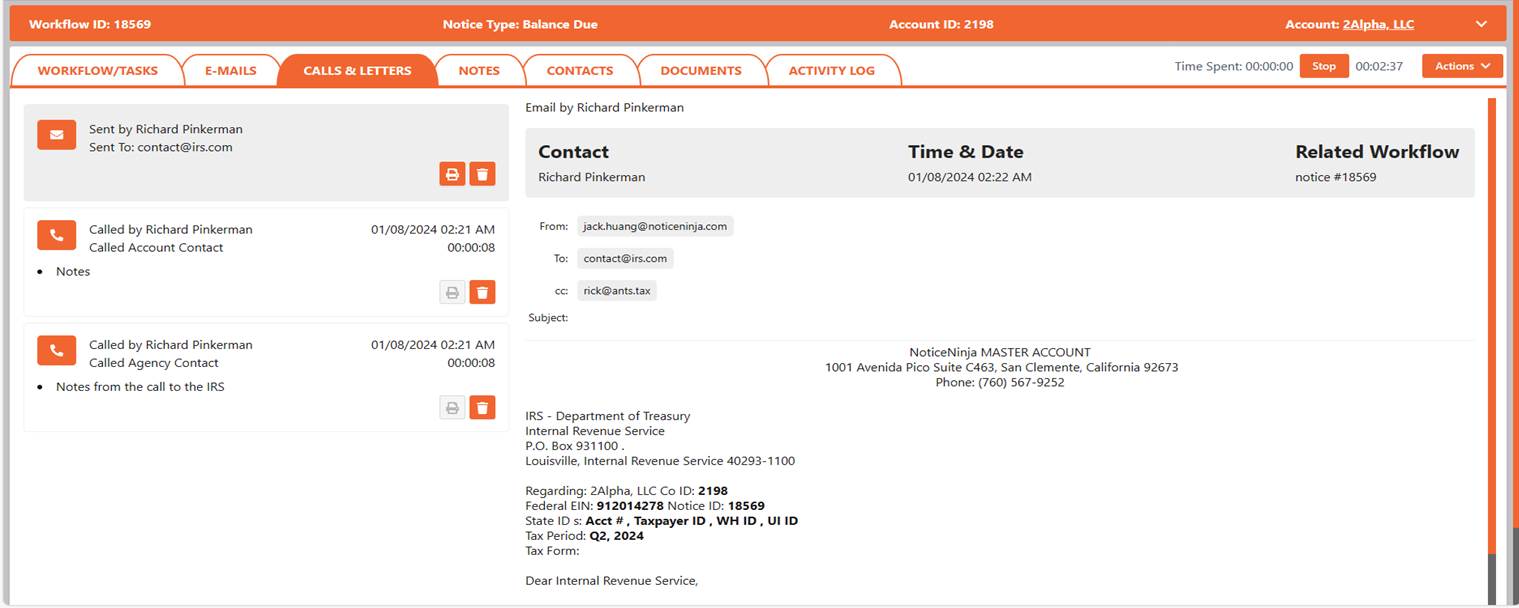
3. Calls & Letters Tab: This tab
is used for calls “and when sending emails or letters that are printed out and send via mail.
Add New Communication:
From the Actions dropdown select Add Attachment.
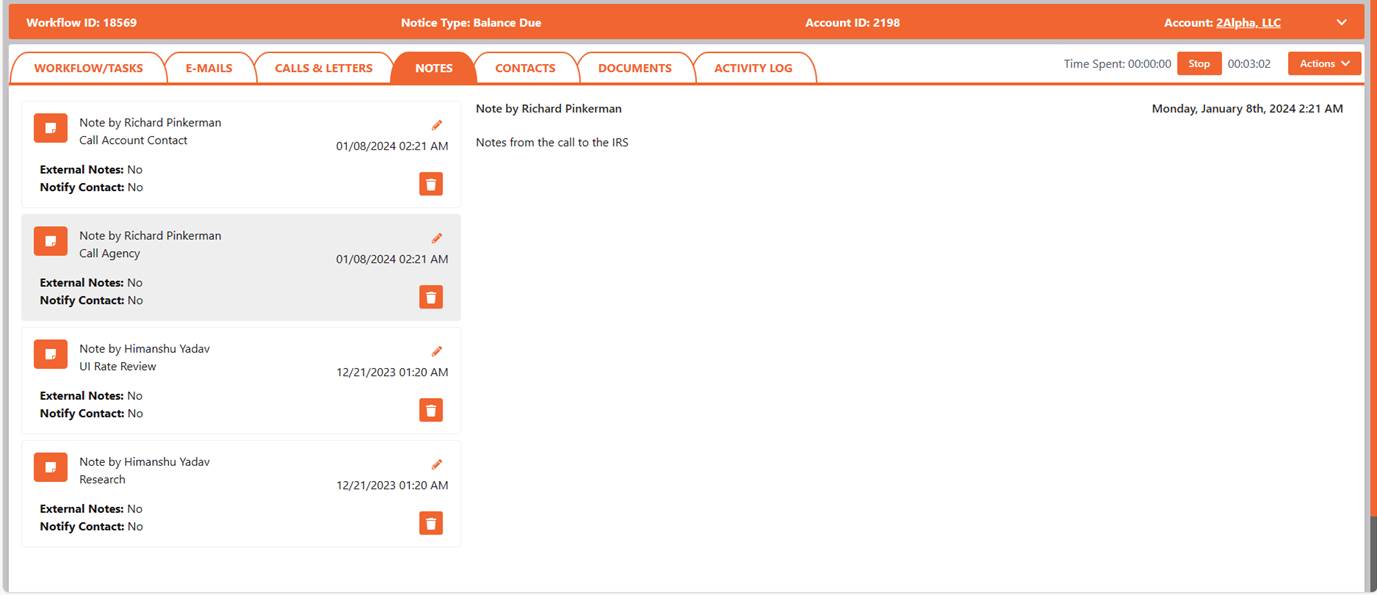
4. Notes tab: This tab
is used to store all the notes on the account. Use these notes to keep track of
account related information.
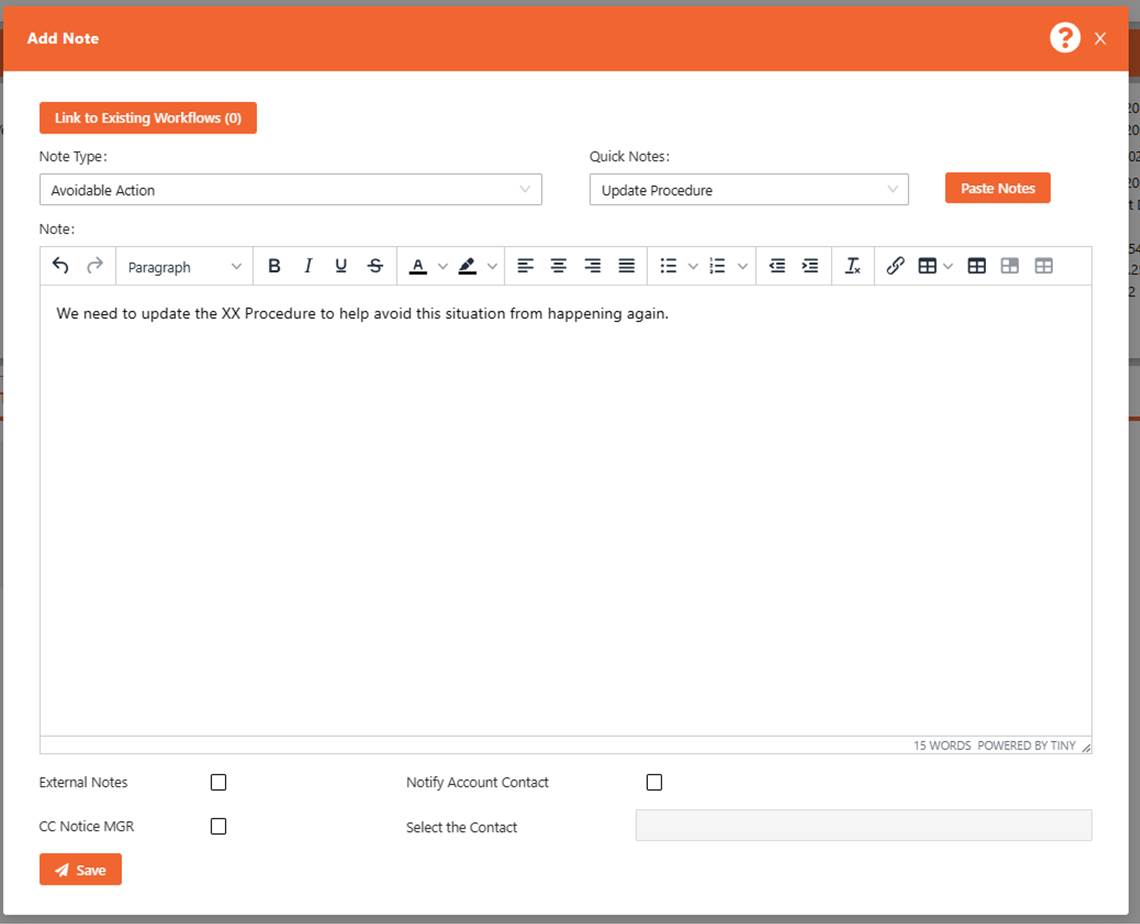
Add New Note: From the Actions dropdown select Add Note.
Select the Note Type: What the note is about.
Quick Notes: Use the Quick Notes to add notes that you use all
the time, so you do not have to type them out. This helps ensure notes are
entered on all tasks.
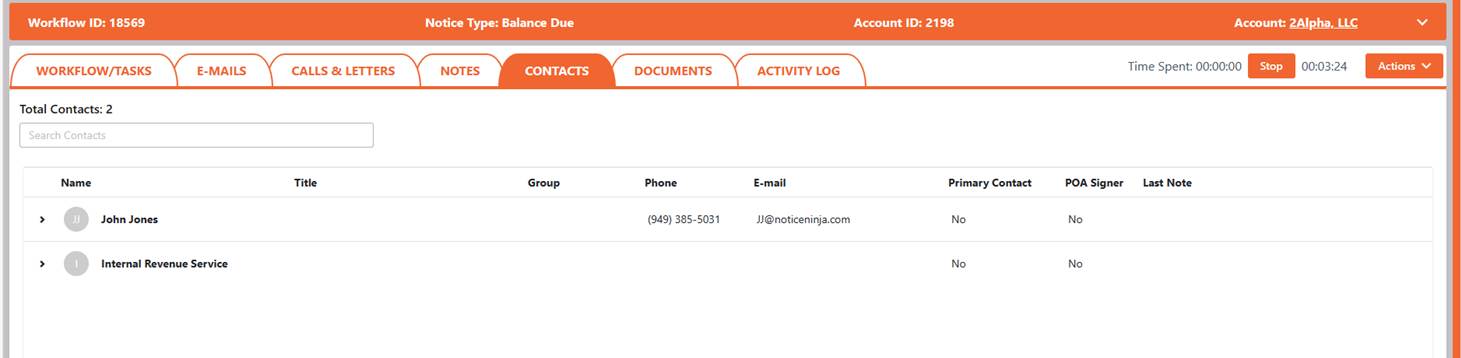
5. Contacts
Tab: This tab is used to hold all the account contacts that have been used
on the notice. The contacts can be someone at the account, vender or the agency
that is used.
Add New Contacts: Click the Add Contact from the contact tab.
You can add Account or Agency level contacts from the workflow screen.
Call a Contact: From the
Actions dropdown select either Call Account Contact or Call Agency Contact.
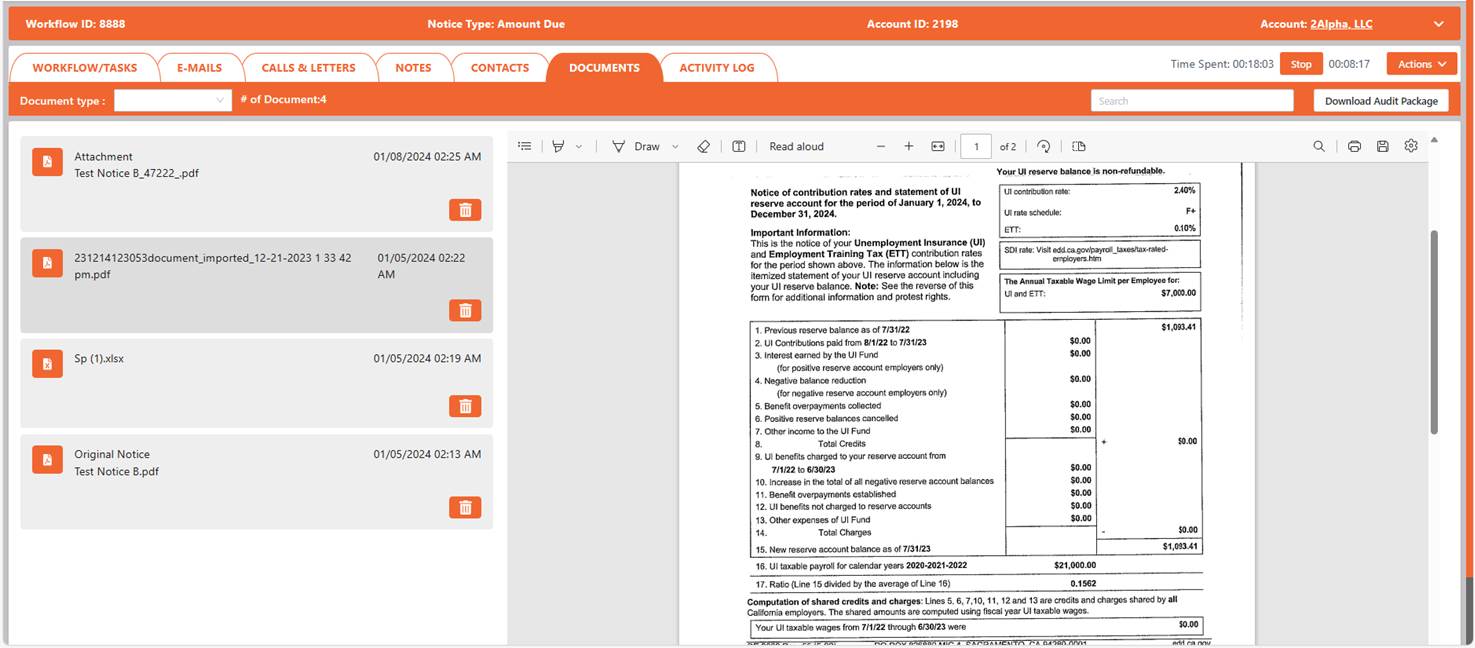
6. Documents
Tab: This tab is used to store all the workflow documents. This allows you
to see all documents related to the notice workflows.
Add New Documents: From the Actions dropdown select Add
Attachment.
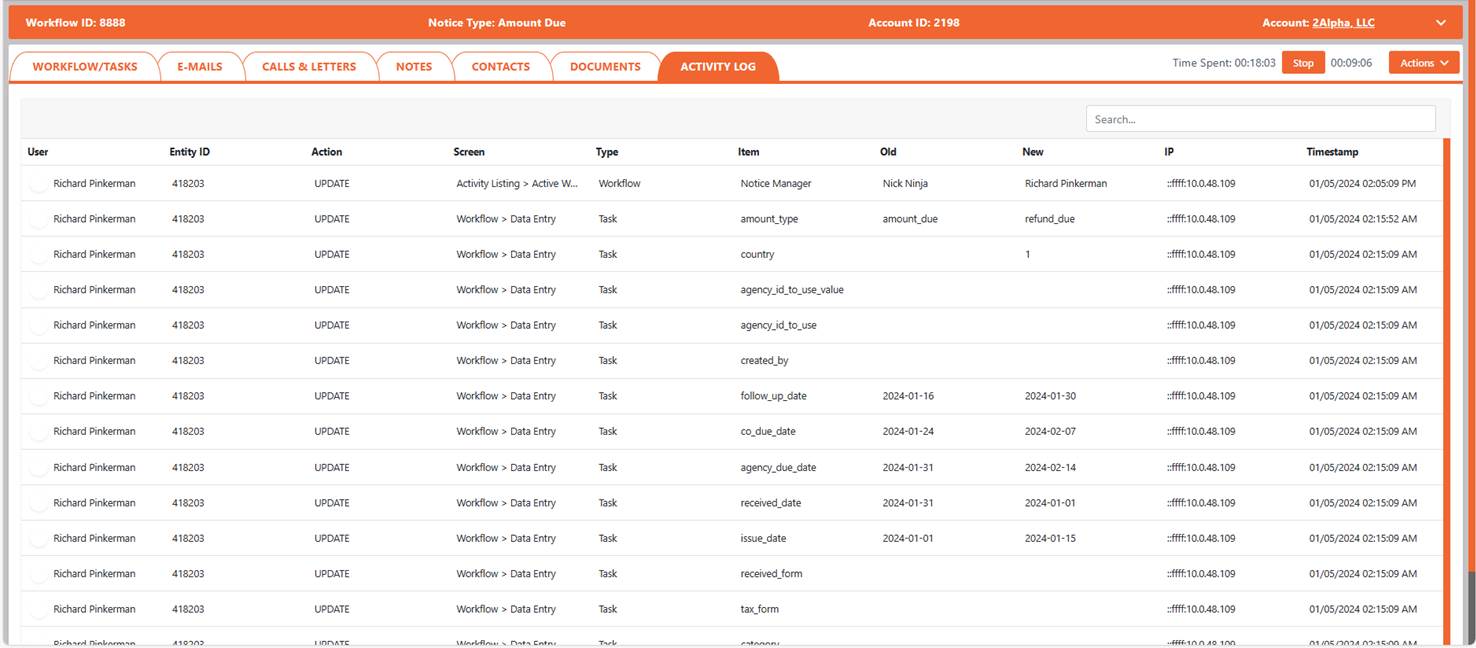
7. Activity
Log Tab: This tab is used to track all changes on the workflow. Use this to
audit what was changed, when it was changed and who it was changed by.
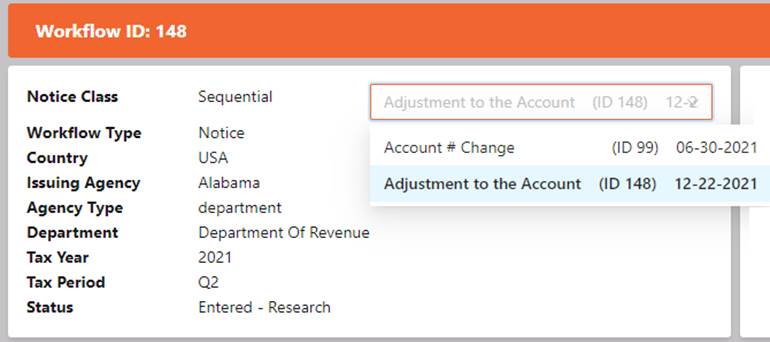
1.1 Sequential
Notice Entry:
If the notice is a
Sequential Notices the screen will display a dropdown list of all the notices
(sorted by received date). This is used to show what was done on each notice.
The Notice Info and Relative Dates are updated once you select a notice. By
default, NOTICENINJA selects the last notice entered to display (Current Active
Sequential Notice). All notice research and supporting data is linked to
the individual notice and will display based on notice selected.
When entering a notice
screen, the system does a verification to see if there are other notices for
the same account, agency, department, and tax period. If so, this message will
pop up. This will allow you to link the notice, Merge the notice, mark as a
Duplicate notice or close the screen.


While on a Sequential
notice you will see the dropdown option to pick the notice you want to
research.
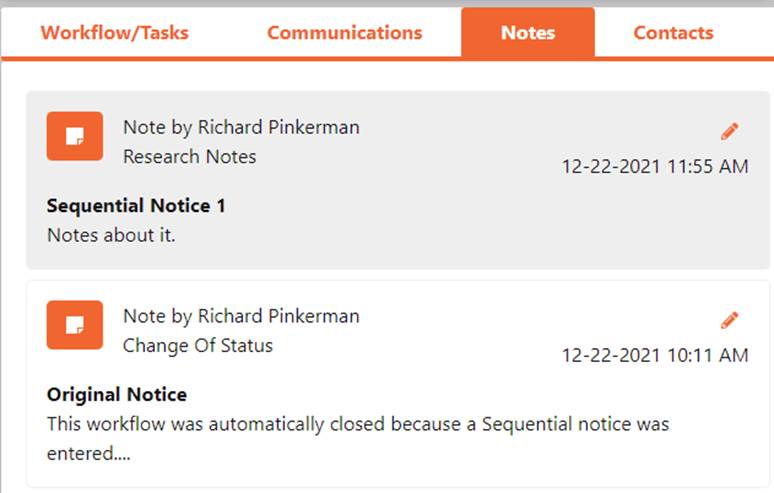
Notes: Select the notice you want to add notes to and
then click Add Note. NOTICENINJA will identify the individual notice the note belongs to in
the header of the note.
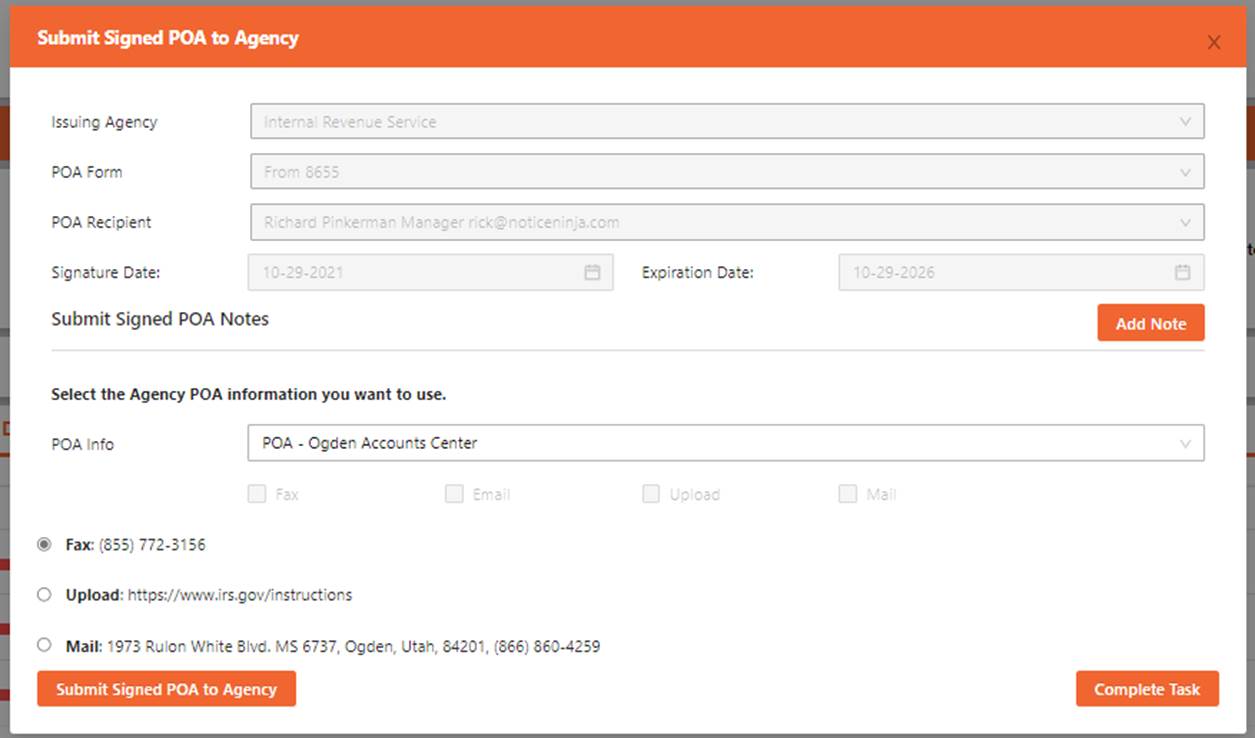
The POA workflow is used for two
things. To get an E-Signed POA filled out or to upload a pre-signed POA into
the system. The POA’s are stored on the account screen on the POA tab and show
if you have a POA on file on the Agency tab.
STEP 1:
SELECT A POA WORKFLOW
1.
From the main screen or the account screen click
the Action > Enter Workflow to
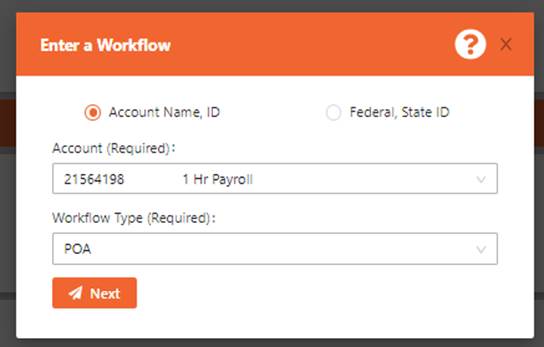
STEP 2:
ENTER THE DETAILS
1. Select the
Type and enter the Details.
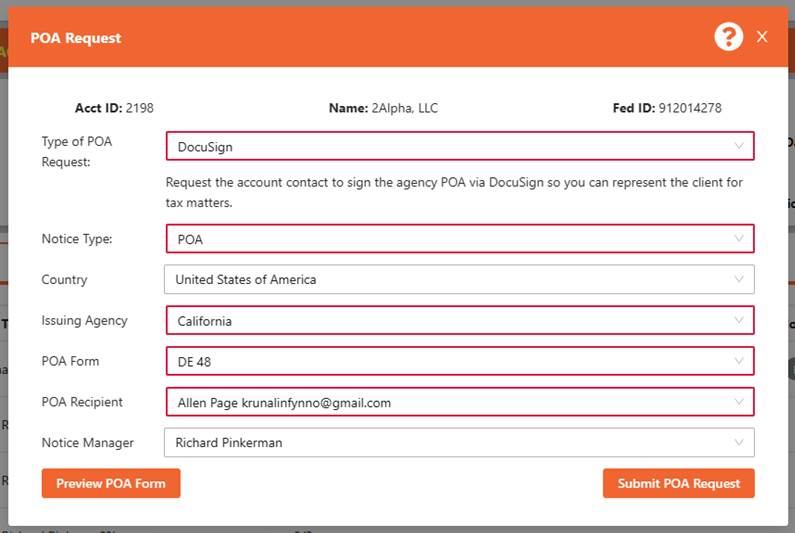
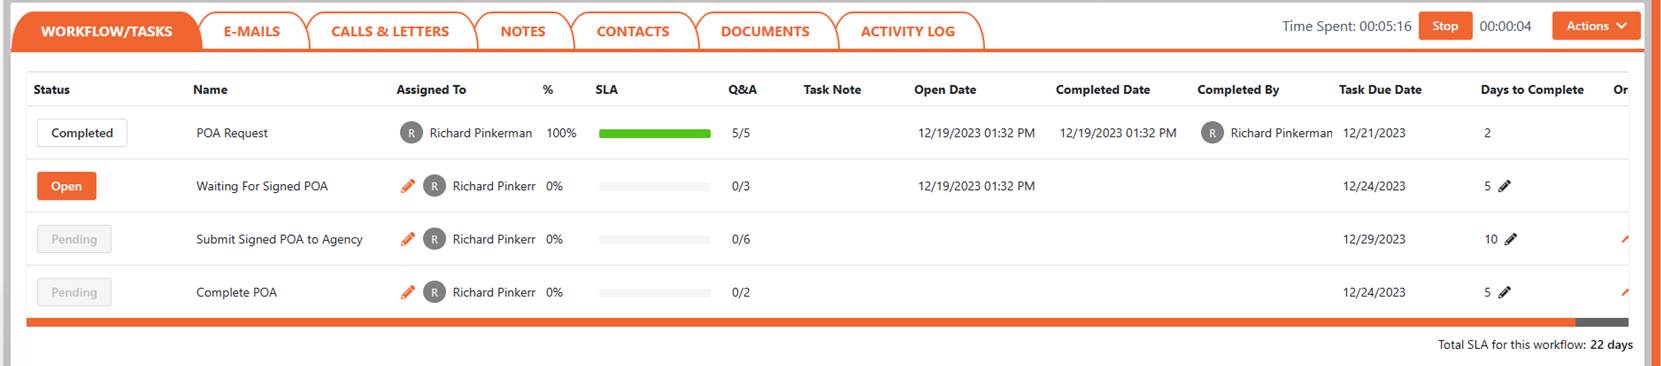
STEP 3:
PROCESS THE POA
1.
Use the Options and Tasks to process the POA
request.
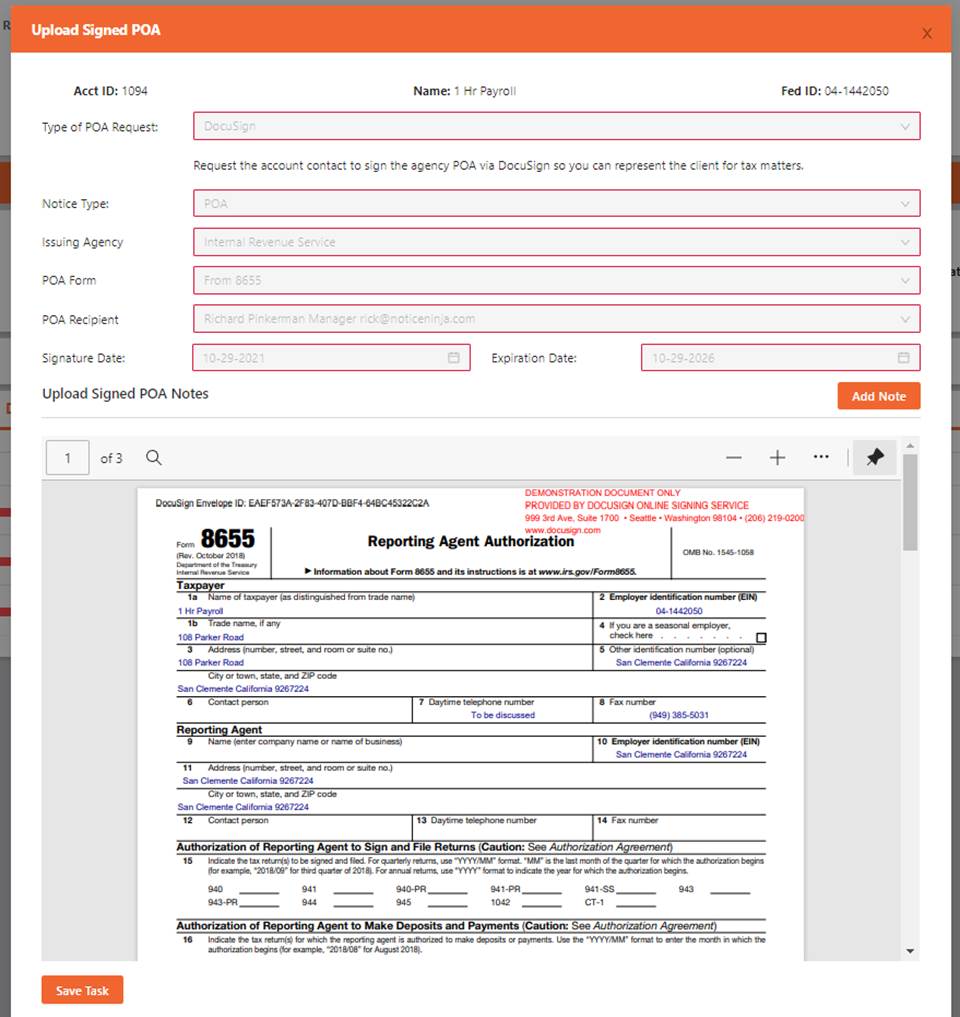
2.
Once the Account Contact signs the POA it will be
uploaded back into NOTICENINJA.
3.
Use the last Task to upload it to the agency and
complete the POA workflow.
The Pending
Notice Workflows are used as an Exception to the OCR Notice Entry. If the
system cannot find one of the critical data items from the notice it creates a
Pending Notice. The Pending Notice workflow is only used for ONE TASK, the Data
Entry.
If the
account was not located, you will need to link the account to the notice. Select
the Account Associated to the Notice to move to the next step.
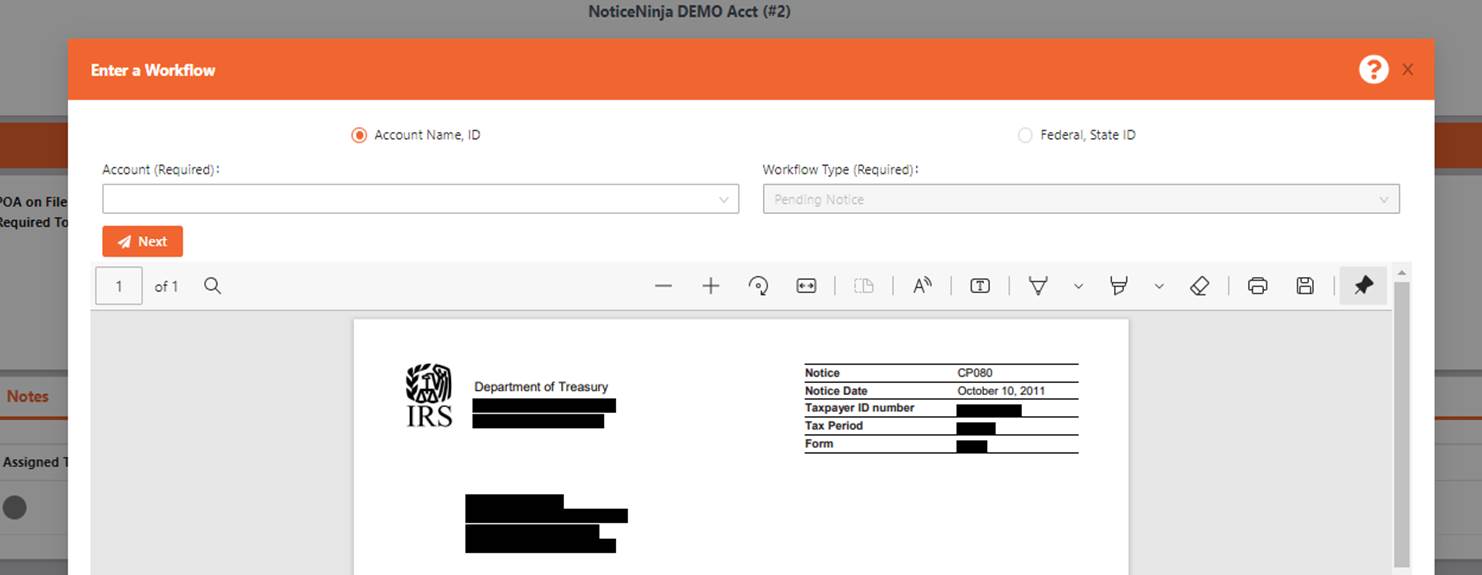
Once the
account is linked you can fill in any missing agency data items.

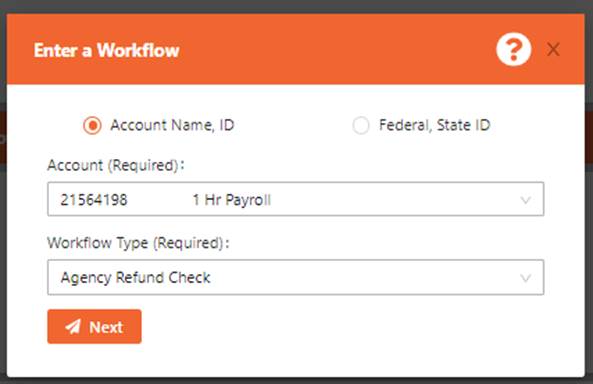
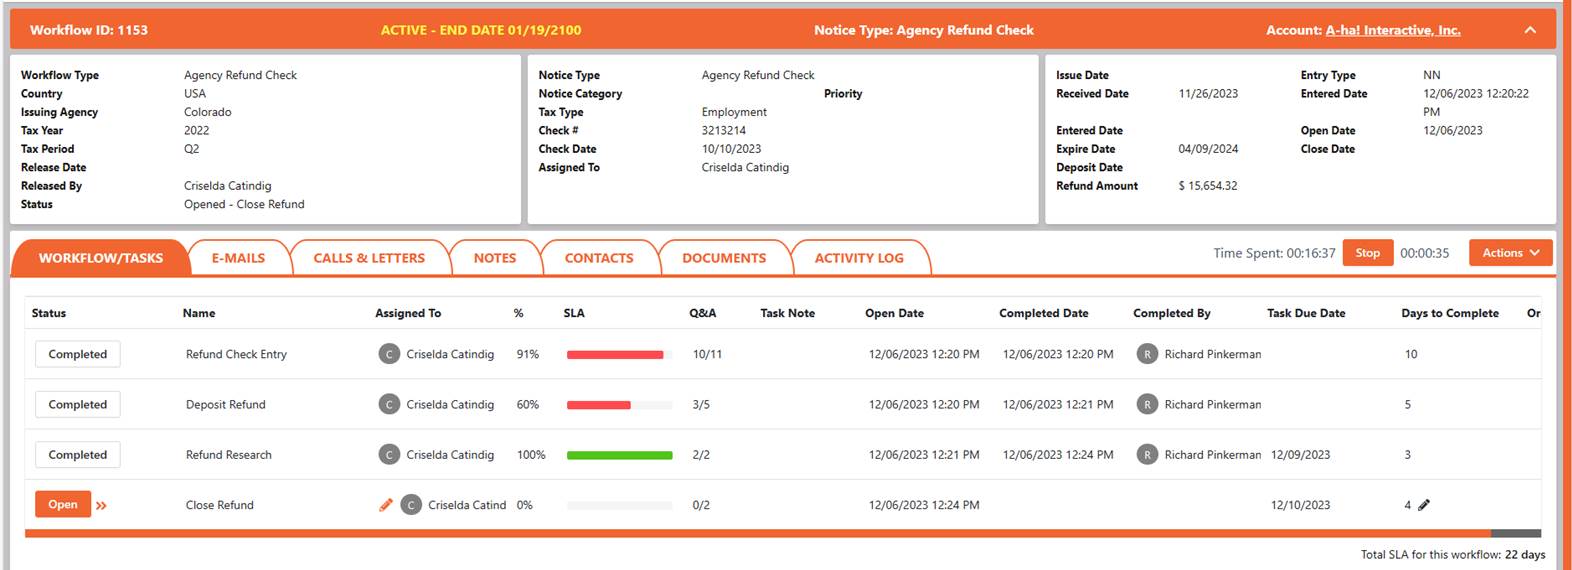
The agency
refund check workflow was designed to track the actual check the agency sends
out. This workflow allows you to track the check data and the expiration date
of the refund check based on the agency. The workflow options are the same as a
notice, the tasks are linked to processing a refund check.
ENTER A Refund Check:
STEP 1: SELECT A Agency Refund WORKFLOW
1. From the
main screen or the account screen click the Action > Enter Workflow to
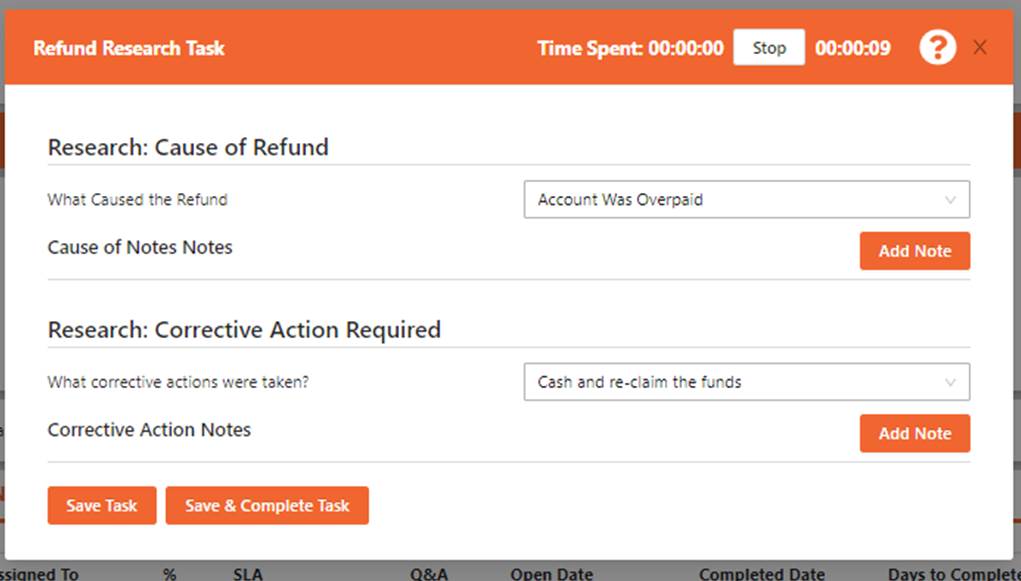
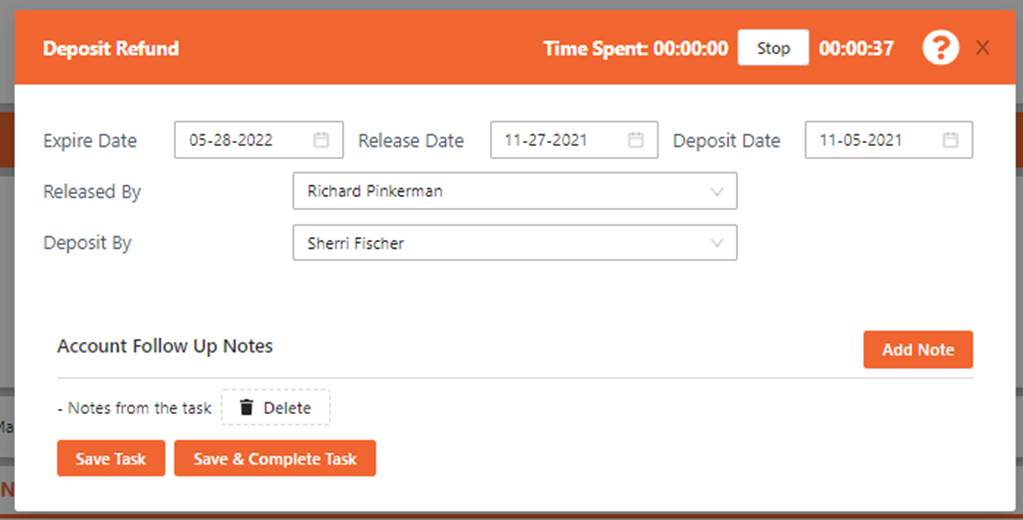
Refund
Entry: Use the
options to select all the details about the refund check.

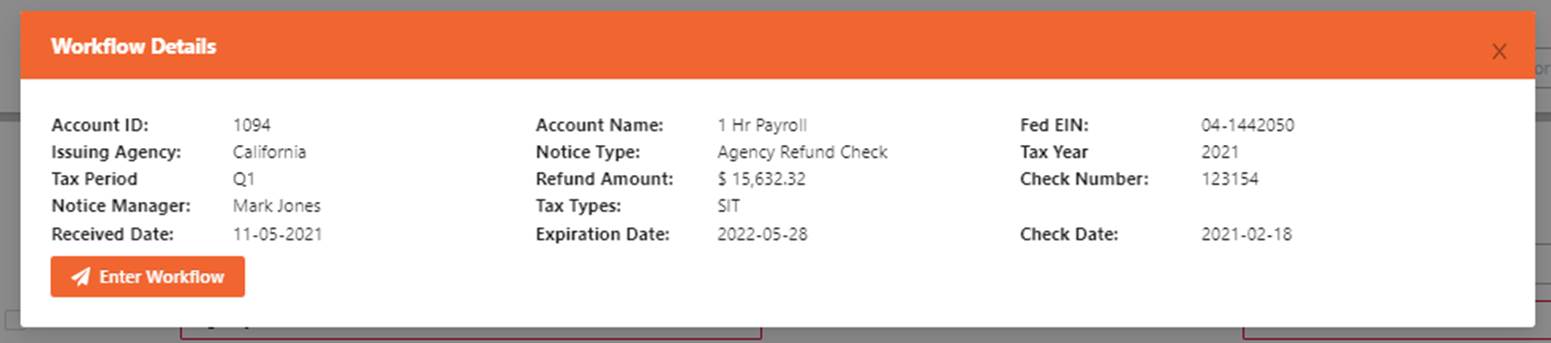
Workflow
Details: Used to
verify the information entered on the Agency Refund Check.
The registration workflow was
designed to help tax professionals better organize all the information and
tasks required to process a state registration. The workflow was designed to
capture all the required information from the company before submitting the
registration request. Follow the set of tasks to enter, validate, request, and
complete each registration. Some state registrations require you to have a
POA’s and or PIN to register, the system allows you to enter and track those
items.
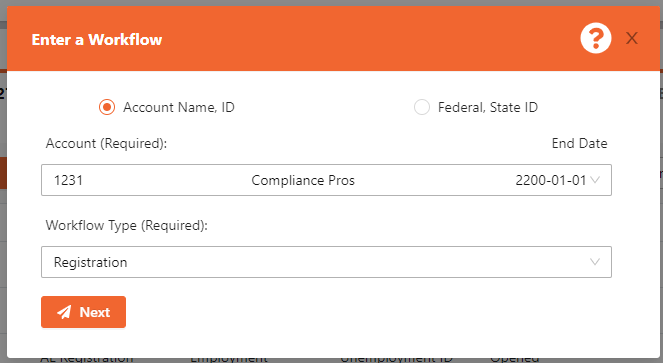
ENTER A NEW REGISTRATION:
STEP 1: SELECT THE REGISTRATION
WORKFLOW AND ACCOUNT.
1.
From the main screen or the account screen click
the Action > Enter Workflow.
2.
Select the Account and the Workflow Type.
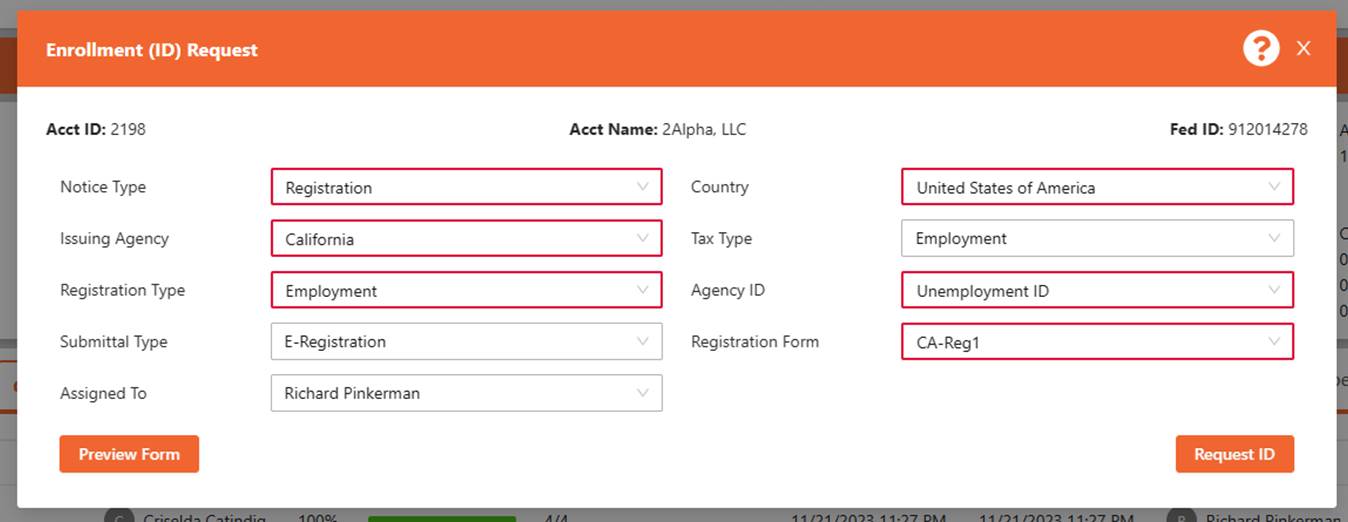
STEP 2: ENTER THE AGENCY
INFORMATION
1. Enter the
Agency information related to the Registration.
2. Click the
Request ID to complete the task and proceed to the next task.
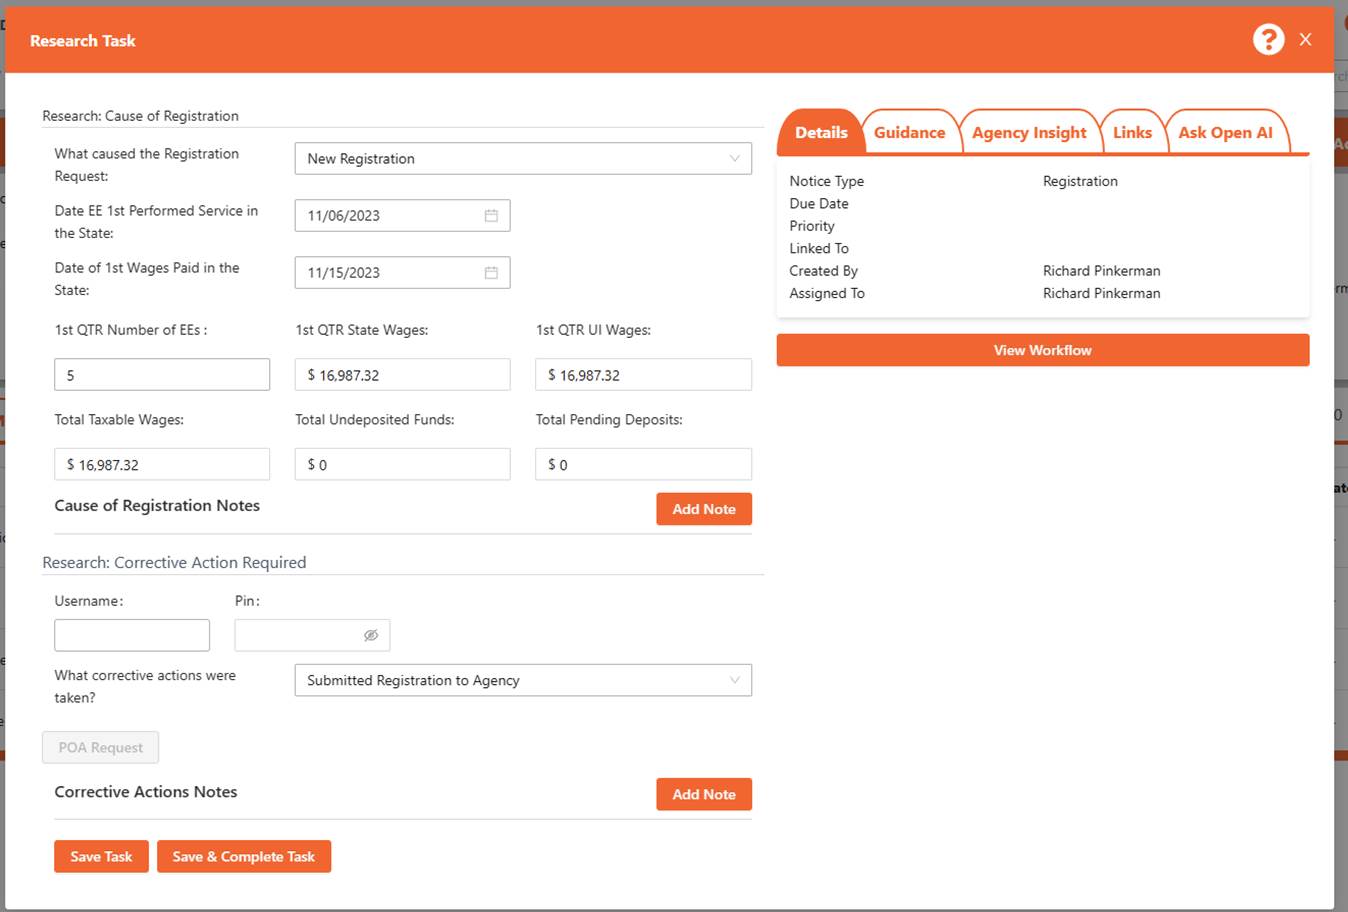
STEP 3: (RESEARCH) ENTER THE
DETAILS
1. Enter the
information related to the individual account registration.
a.
All fields are used to populate the registration
form.
b.
Some agencies require you to get a PIN to log in
with.
c.
Once done click Save & Complete to proceed to
the next task.
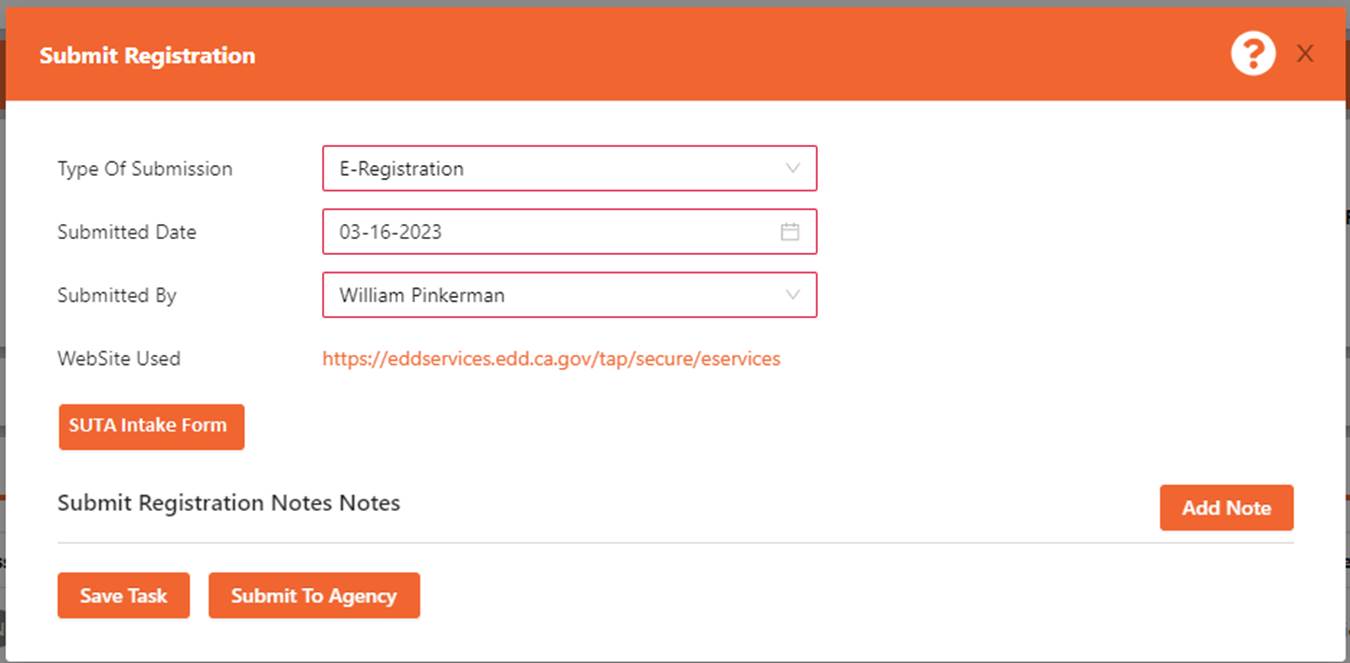
STEP 4: (SUBMIT REGISTRATION)
SUBMIT THE REGISTRATION TO THE AGENCY
This task is used to track how
long it takes the agency to process the registration. Some agencies will give
you an ID at this point, others it may take several days to get a
response.
1. Use this
task to register the account.
2. Click the
Website link to open the website used to submit the registration.
3. (E-Registration)
Click the SUTA Intake Form. Used as a template to help fill out the online
form.
4. (File Form
Registration) Click the Intake Form to have the agency form populate.
a.
It gets saved down to your downloads so you can
upload it to the website.
5. Make sure
to add notes as needed so others know any special notes.
6. Once submitting the registration with the
agency, click the Submit to Agency to complete the task.
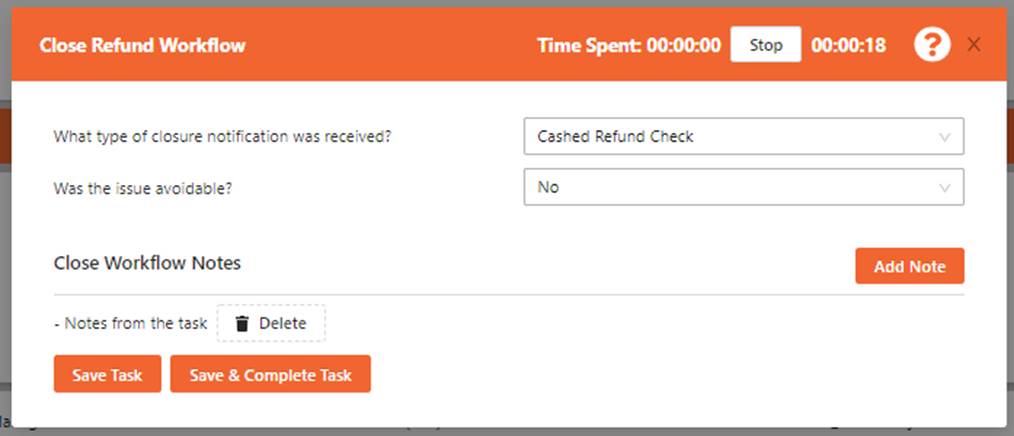
STEP 5: (CLOSE WORKFLOW) UPDATE
THE ACCOUNT ID AND CLOSE THE WORKFLOW
Once you get the new Account ID
from the agency you can document the changes made and close out the workflow.
1. Enter the
new account ID and other information on that task.
2. 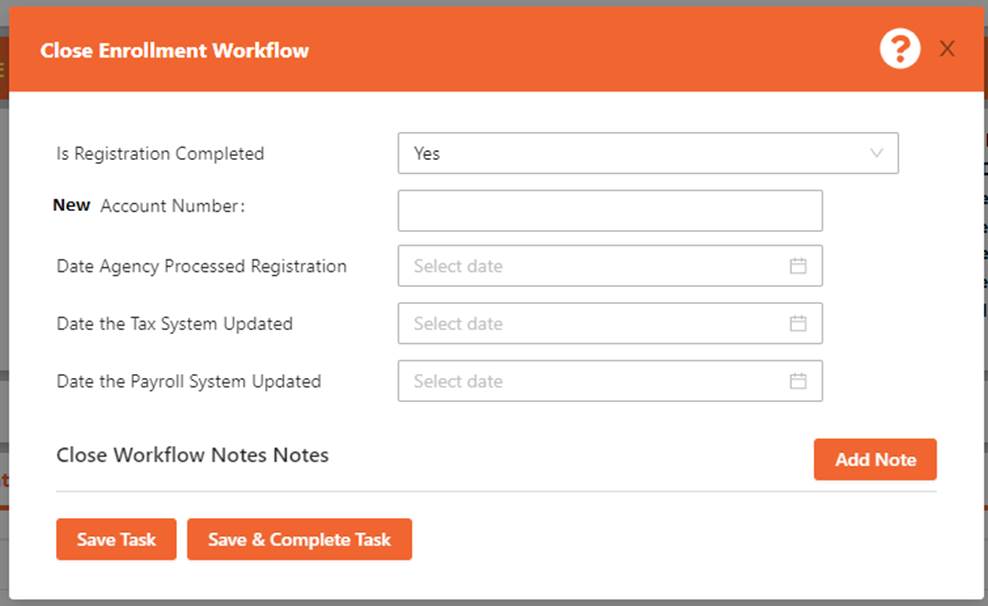 Click Save
& Complete Task to complete the workflow.
Click Save
& Complete Task to complete the workflow.
The Amended Return (AR) workflow
was designed to help tax professionals better organize all the information and
tasks required to process a federal or state adjustment and amended returns.
The workflow was designed to capture all the required information on the AR
before submitting it for processing. Follow the set of tasks to enter,
validate, request, and complete each adjustment and amended return.
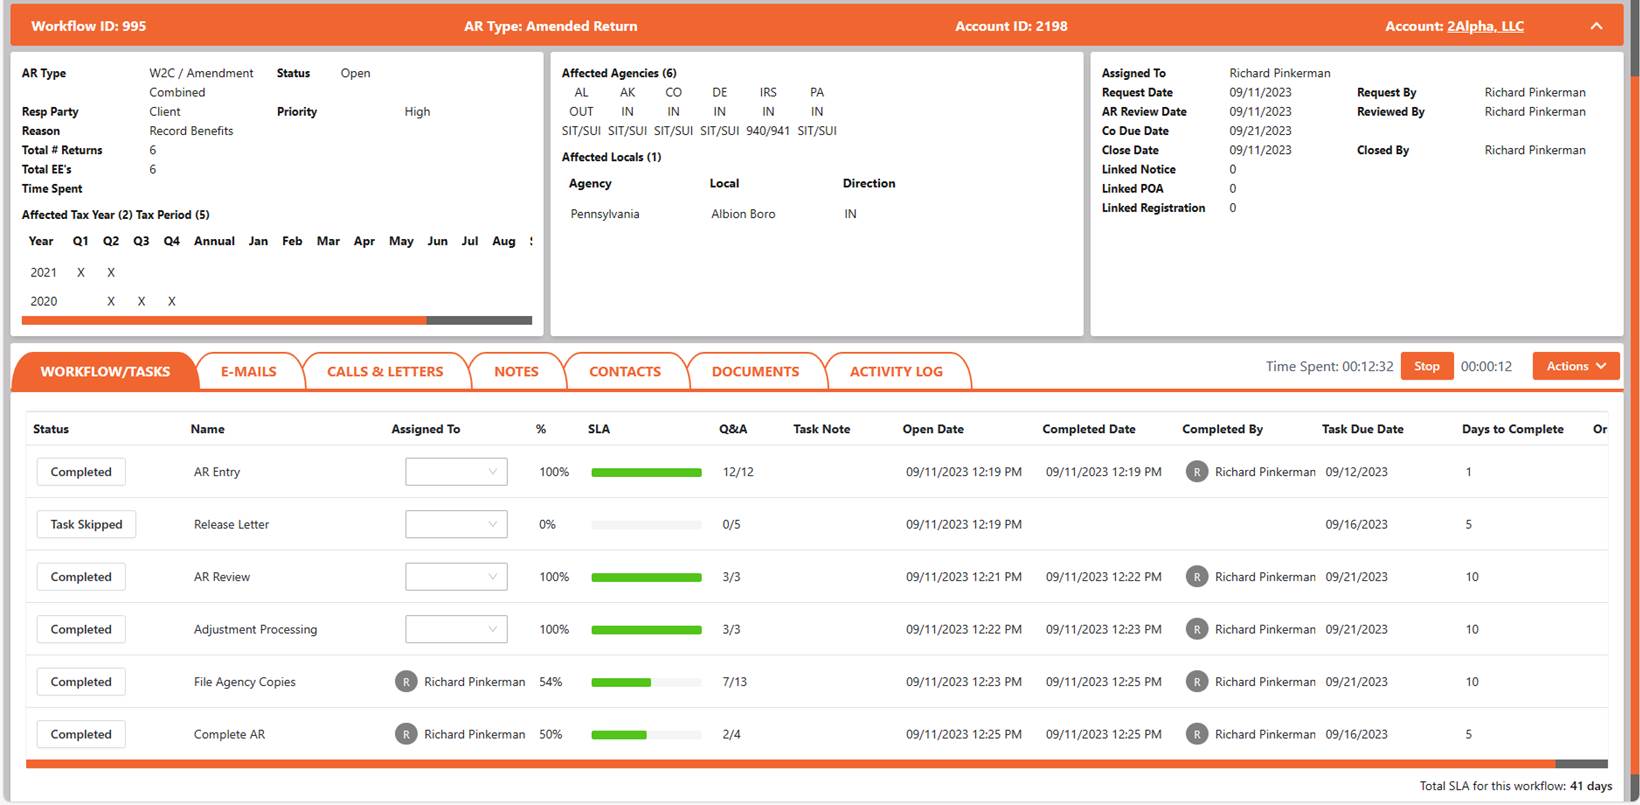
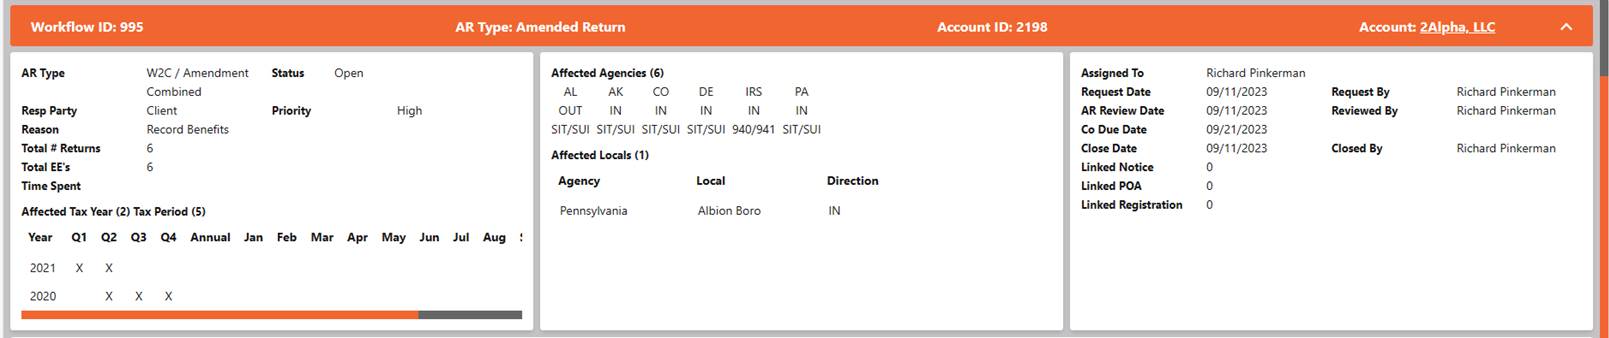
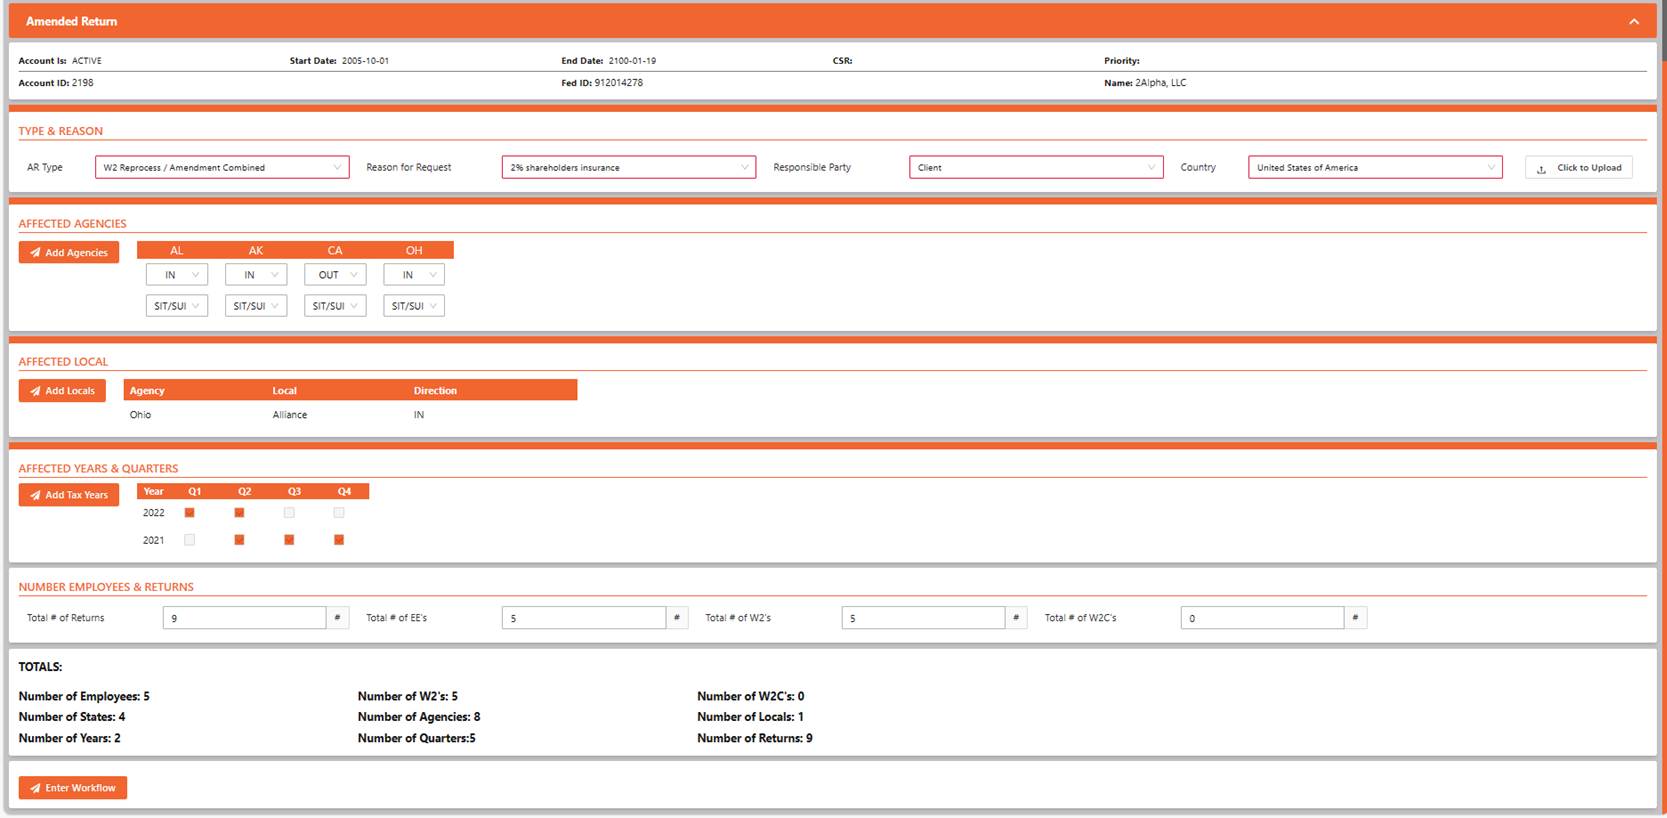
1. The
Amended Return (AR) detail screen holds all the data on the AR. Just like the
other workflow there are two sections of the AR workflow screen. The top
section is used to display the AR ID, AR Type and Account information along
with the details of the AR in the three boxes across the top of the screen. We
also display the default contact on the account at the bottom of this section.
a.
The 1st box holds the high-level request
information on the AR. It also holds the affected tax periods.
b.
The 2nd box holds the Agencies affected
and lists any locals or cities that are included in the AR.
c.
The 3rd box holds the user the workflow
is assigned to, relative dates associated to the AR and any links to other
workflows.
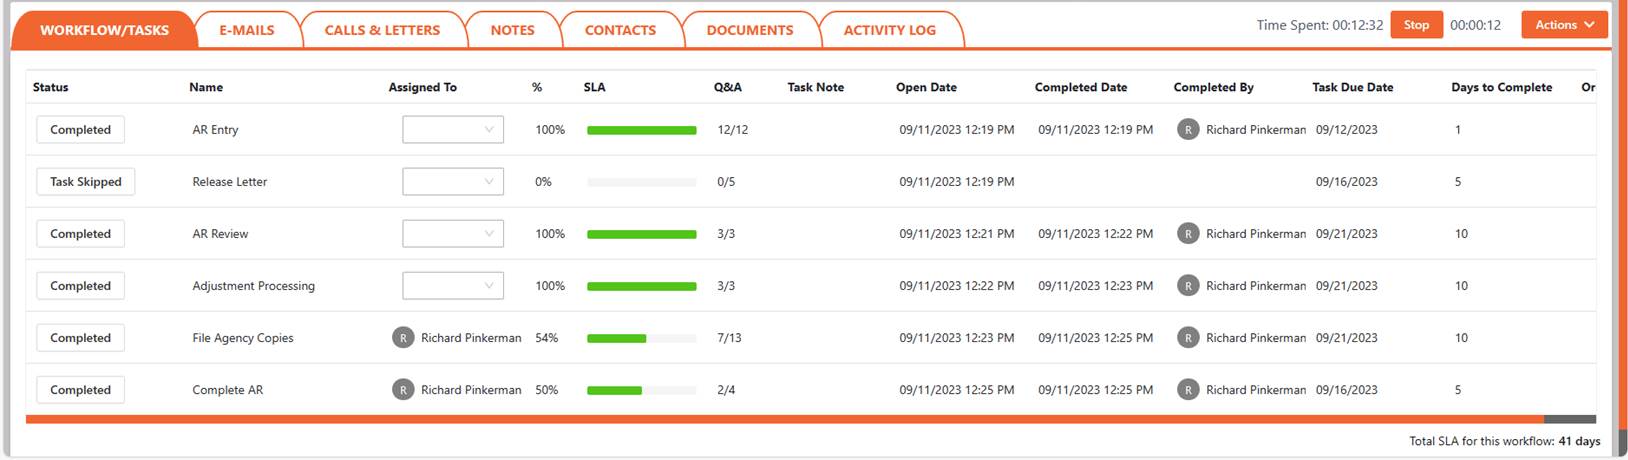
2. The bottom
section of the screen holds the data in the different tabs.
a.
The Workflows / Tasks Tab: This tab is used to hold
all the tasks associated to the given workflow. Use this tab to complete the
tasks in chronological order to resolve the workflow. To open a task, click the
Open button to see the details of the task.
NOTE: Add
New Task: From the Actions dropdown select
Add Task. The new task will be added below the active task.
b.
The Communications Tab is used
to store any calls or letters sent out to the agency or to an account contact.
c.
The notes Tab holds all
the notes from the tasks and from the actions > add note function.
d.
The Contacts Tab holds the
contacts you contacted on the AR.
e.
The Documents Tab holds all
supporting attachments related to the AR.
f.
The activity log Tab
tracks all changes to the AR workflow that are not logged.
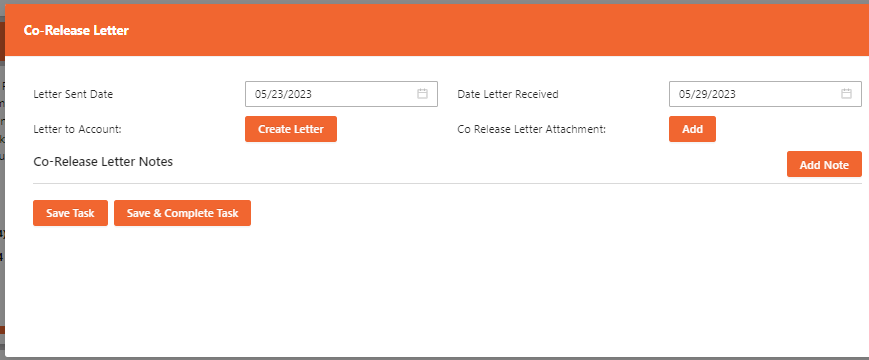
The Co-Release Letter task is used
to track when you send out the absolution letter to the account contact to sign
and send back.
The Review Amended Return Request
is used to validate the request type and either approve it or reject the AR
request.

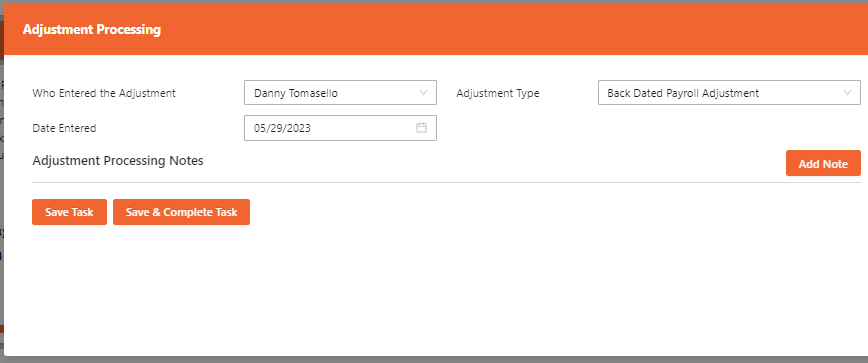
The Adjustment processing task is
used to track when the ADJ was processed and who processed it. Every task has
notes for the user to enter the details about that task process.
The File Agency Copies task is
used to track the Liability Type and the details around processing and filing
with the agency. The more data entered here the better the reports are.
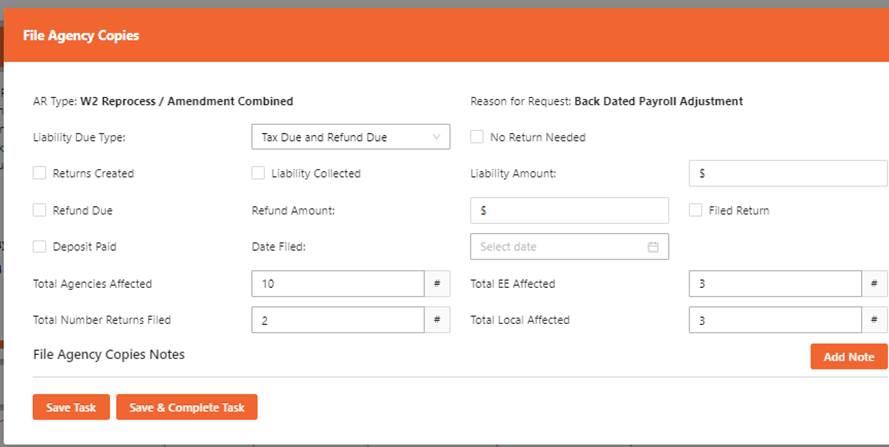
There are several options to pick
from when selecting the liability type.

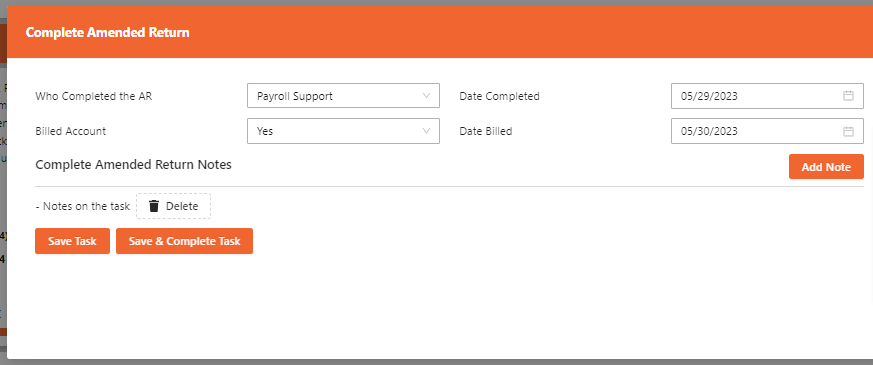
The last task to the AR workflow
is the Complete the Amended Return. This task tacks when the AR has been
completed and if it needs to be billed.
Just like all other workflows
there are options that the user can select to help document the AR process. The
tasks are the same as the other workflows to help with quick learning of the
workflow options.
![]()
HOW TO ENTER a NEW Amended
Return:
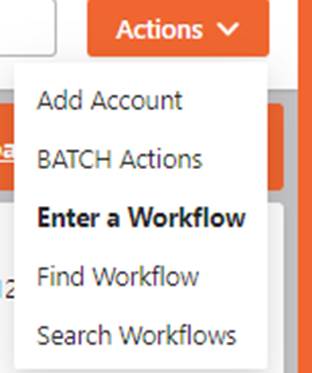
STEP 1: GO TO ACTIONS > ENTER A
WORKFLOW > SELECT the Amended Return WORKFLOW
2. From the
main screen or the account screen click the Action > Enter Workflow.
STEP 2: ENTER the Amended Return
DETAILS
2. Select the
Workflow Type and enter the Details.
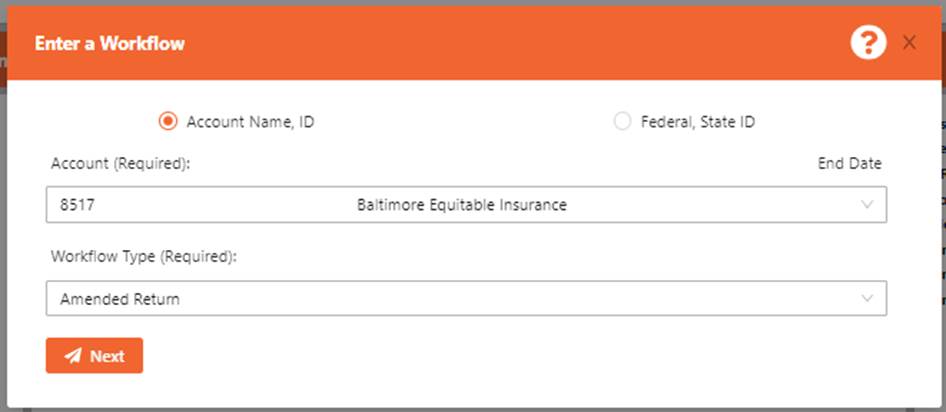
NOTE: You can add new TYPES &
REASONS to the system to choose from.
STEP 3: PROCESS ENTER the new
Amended Return
4. Use the
Enter Workflow button to create the Amended Return workflow.
Navigation Tips:
NoticeNinja uses a series of Modules and
Screens that control the display of the data held in the system. Each Screen
holds specific information (Account, Workflows & Tasks, Knowledgebase, , Reports, and System Setup) pertaining to the screen
title, organized in a general layout. The navigation bar on the top of the
screen will tell you where you are. To go back to the previous screen, you were
on click the menu item from the top of the screen.
![]() To open
any “Module” (Account, Workflows & Tasks, Knowledgebase,
, Reports, and System Setup) click on the Icon/Description. Once in each
Module Screen there are options you can choose from (Tabs, Line Items, Reports,
and Workflows). Some links open New Screens to display the related data. There
are two navigation options, either use your mouse (Point and Click) or use the
keyboard (Tab, Up/Down Arrows, and Enter) keys.
To open
any “Module” (Account, Workflows & Tasks, Knowledgebase,
, Reports, and System Setup) click on the Icon/Description. Once in each
Module Screen there are options you can choose from (Tabs, Line Items, Reports,
and Workflows). Some links open New Screens to display the related data. There
are two navigation options, either use your mouse (Point and Click) or use the
keyboard (Tab, Up/Down Arrows, and Enter) keys.
Keyboard Navigation Only
![]() Throughout
NoticeNinja you can
use your (Tab, Up / Down
Arrow and Enter) keys to
navigate throughout the system. (Tab) moves to the next Module or Field to the
right. Use the Up/Down Arrow to make drop down selections. (Enter) will open or
commit your selection.
Throughout
NoticeNinja you can
use your (Tab, Up / Down
Arrow and Enter) keys to
navigate throughout the system. (Tab) moves to the next Module or Field to the
right. Use the Up/Down Arrow to make drop down selections. (Enter) will open or
commit your selection.
2024 – 2026 NOTICENINIJA. All rights reserved.